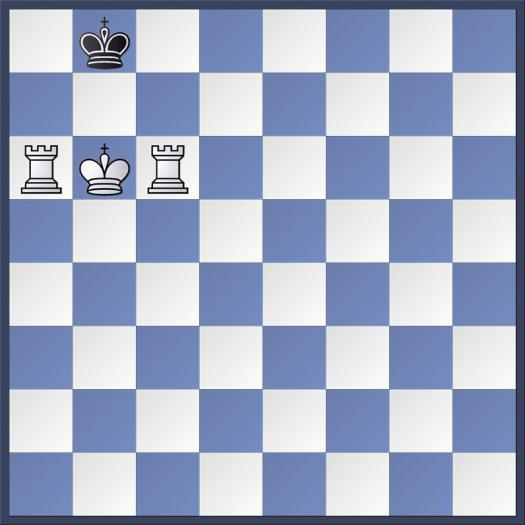
White to play and mate in three, moving each piece once?


Promoting Chess in the North-East
White to play and mate in three, moving each piece once?
STRANGEST COINCIDENCE EVER – OR HOAX?
The case of the Polish Rxb2
 Black to play ‘Ortueta – Sanz’ Madrid 1933 |
ONE OF THE MOST FAMOUS and beautiful combinations that ever occurred over the board is the one in the diagram on the left. Petrosyan once said that when he first saw it at age 10, it thrilled him so much that it was a major factor in binding him to chess forever. Hugh Alexander wrote: ‘I always have trouble believing that this endgame really occurred in a game, and not during a post-mortem.’ And when the great endgame composer Henri Rinck was asked by Tartakower if this could not be turned into something really beautiful, he said that nothing needed to be added, nothing needed to be cut.
The key move of the combination (if you know there is one) may be obvious: 1…Rxb2!! Sanz, a one-time champion of Spain (1943), and 25 years old at the time, found the move that made him immortal after some forty-five minutes of calculating. 2.Nxb2 c3 3.Rxb6 (or 3.Nd3 c4+ 4.Rxb6 cxd3 etc.) If now 3…axb6 4.Nd3, but: 3…c4! This move, and the next, are not obvious at
 |
| Position after 4.Rb4 |
all. Rook and Knight down, Black finds time for a quiet move to cover d3. 4.Rb4 The only move. (See diagram on the right.)
4…a5! The crux of the combination and, as Sanz later said, the most difficult move to find. Now Black cannot be stopped from queening. There are two ways in which White can play for a draw:
a) 5.Nxc4 c2 This happened in the game. Some sources say White resigned here, others that he resigned after a few more moves. There might follow: 6.Rb3 cl=Q+ 7.Kf2 Qxc4 etc., or:
b) 5.Rxc4 cxb2 followed by promotion with, in both cases, a Q vs. R endgame that Black can win without too much trouble.
But these endgames are not relevant because, as we shall see below, the ‘Ortueta-Sanz’ position as I gave it in the first diagram (which is the way it is almost always given) is a stylised version, probably invented to make sure Rxb2 is the only way to win.
Mate in 4 – Leonid Yarosh
 |
1st Prize Shakhmatyi v SSSR 1983Mate in 4… – you may feel cheated that the ‘Diagram of the Century’ turns out to be a problem, the way I felt cheated when, as a boy, I went to a mouth organ club, and all the lessons turned out to be about Jesus.
You would, however, be cheating yourself if you left this page now.
If you don’t, you can go to the solution immediately. But there is, as one chess lover wrote, ‘profit and pleasure in the telling.’
Let’s try to follow the thoughts I might have had, had I tried to solve this problem myself.
What catches the eye immediately is the elegance of the position. It is far from gamelike but still, other than in most problems, it has patterns that are meaningful to the ordinary chessplayer.
Well, mate in 4. Let’s threaten something. 1.Re1 threatens 2.Re4 mate. Now 1…Qxa8 2.Rxf4+ would be mate next move, but with 1…Qxd8+ Black forces stalemate. Then maybe something like 1.Rg1, to threaten 2.Qe1 or Qf1? In that case again, after 1…Qxa8 2.Rxf4+ Qe4 3.R1g4 White mates in time, but once more, 1…Qxd8+ is enough to stave off the mate long enough.
Another obvious approach is to see what happens if we give a check. At first sight, that might seem to work: 1.Na4+ Kd3 2.Qc3+ Ke2 3.Qf3+ Kxd2 4.Qd1 mate, or 1.Nd1+ Kd3 2.Qc3+ Ke2 3.Bf3+ Kf1 3.Rh1 mate. But after both checks, Black can also capture on c4, winning a new flight square on b5, and then mate takes one move too many: 1…Kxc4 2.Qc3+ Kb5 3.Qxb3+ Kxa6 4.Bb7+ and mate next move.
Apart from that, both after 1.Na4+ and Nd1+, Black also has 1…b2. If then 2.Rxb2 Qxd8+ is clearly enough to stave off the mate long enough. 2.Qxb2+ is a better try, but after Qxb2 3.Nxb2 axb1=Q 4.Rxf4+ Qe4 5.Rxe4 it has again taken one move too many to deliver mate.
Of course, if any of these crude attempts had worked, Yarosh’ problem wouldn’t be the diagram of the century. But as always with problems, finding the right refutations will lead to finding the solution, and this last attempt teaches us something important. Why, in that variation 1.Na4(d1)+ b2 2.Qxb2+ Qxb2 3.Nxb2 axb1=Q 4.Rxf4+ Qe4 5.Rxe4 mate, was it mate at all, if too late? Because the black Queen no longer defended the Bf4. Indeed, without that Queen, it would be mate in 1 by 1.Rxf4. Then what if we tried to disturb the queen in controlling that square?
There is one obvious move to do that: 1.a7
Having a hunch that the thematic defence will be axb1=Q, we’ll try to cross off Black’s other possibilities first. He has two Queen moves that defend the mate without defending the Bf4, but after both White is in time: 1…Qxa8 2.Rxf4+ Qe4 3.a8=Q Qxf4 4.Qd5 mate. Or: 1…Qxd8+ 2.Kg7 and now 2…Qg8+ 3.Kxg8 and 4.d8=Q mate or 2…Qxa8 3.Rxf4+ Qe4 4.d8=Q mate or 2…Qc7 3.d8=Q+ Qxd8 4.Rxf4 mate.
So we turn to Queen moves that do defend Bf4. There are three, and against all three White is in time: 1…Qc7 2.Bxc7 axb1=Q 3.d8=Q mate, or 1…Qd6 2.Re1 Qe5 3.Nxe5 fxe5 4.Re4 mate or 1…Qe5 2.Bxe7 Qd6 3.Nxd6 Ke5 (otherwise Bxf6 mate) 4.Nd3 mate. This last variation, necessary for the soundness of the problem, demonstrates that luck is with geniuses.
Queen moves not working, Black turns to his most obvious defence: 1…axb1=Q White must then pursue his attack on the Bf4 by 2.axb8=Q Against the threat 3.R(Q)xf4 and mate, Black has two defences: 2…Qe4 and 2…Qxb2. After 2…Qe4, 3.R(Q)xf4 Qxf4 4.Q(R)xf4 is mate. 2…Qxb2 robs White of the control of two flight squares for the black king; c4 and d3. After 3.Qxf4+ Kd3 there is now no mate next move, but with 3.Qxb3 White regains control over c4 and d3, and as the Qb2 is pinned, it is mate next move by 4.Rxf4.
If this were all, it would still only be a mediocre and rather pointless problem, that wouldn’t even have been accepted by a serious problems magazine or column.
But it is not all.
There is almost a moral lesson here: we get access to beauty through the simple virtue of scrutiny. Have we really checked all of Black’s defences? After 1.a7, we checked all the Queen’s moves, and the promotion: axb1=Q What else could there be to check? Well, the promotion is the wrong wording: Black has four different promotions. But what good could a promotion to rook do him? Let’s just have a look: 1.a7 axb1=R 2.axb8=Q Now, there is no 2…Qe4, but Black still has his other defence: 1…Rxb2, making d3 and c4 available to his King. And if White now continues as before, with 3.Qxb3, it is stalemate. Aha.
Then what? We have to go back one move, to the position after 1.a7 axb1=R. White obviously must capture the black Queen. But if 2.axb8=Q does not work, what does work? It is at this point that the grandiosity of the whole thing might begin to dawn upon us. Suppose 2.axb8=R That still threatens Rxf4 mate, and after 2…Re1 White is in time with 3.Rxf4+ But after 2…Rxb2? Well, now, 3.Rxb3 is not stalemate, and after the only move, 3…Kxc4, 4.Qa4 is mate.
By now we can hardly believe or own thoughts. Could it really be that if Black defends by 1…axb1=B, White has to promote to a bishop too? Indeed, if now 2.axb8=Q, then Be4 3.Rxf4 or Qxf4 is stalemate. But after 2.axb8=B Be4, 3.Bxf4 is not stalemate. The black bishop can move, and must move, and after it does, 4.Be3 or Be5 is mate.
Finally: would 1…axb1=N make sense? It does, because after 2.axb8=Q Nxd2, Black again has access to a vital flight square, now c3, staving off mate long enough; after 3.Rxf4+ Ne4 there is no mate next move.
As stalemate is not an issue now, 2.axb8=R or axb8=B are pointless. The solution must be 2.axb8=N. But is it? Against the old threat of 3.Rxf4+, Black again defends with 2…Nxd2. And now, 3.Qc1 is still mate next move: after any knight move, 4.Rxf4 mate follows, except for 3…Ne4, when 4.Nc6 is mate. It was precisely for this one move that White needed a knight.
So:
If Black promotes to Queen, White must promote to Queen.
If Black promotes to Rook, White must promote to Rook.
If Black promotes to Bishop, White must promote to Bishop.
If Black promotes to Knight, White must promote to Knight.
This Holy Grail of chess had been searched for in vain for over a century. The greatest composers thought it would never be created.
Leonid Yarosh, when he composed this problem in 1983, was a 26-year old soccer trainer from Kazan, and a complete unknown in the composing world.
Here are the main variations of the solution recapitulated:
1.a7!
1…axb1=Q 2.axb8=Q Qxb2(!) 3.Qxb3 Qc3 4.Qxc3 mate
Qe4(!) 3.Qxf4 Qxf4 4.Rxf4 mate
1…axb1=R(!) 2.axb8=R! Rxb2(!)3.Rxb3 Kxc4 4.Qa4 mate
2.axb8=Q? Rxb2! 3.Qxb3 stalemate
1…axb1=B(!) 2.axb8=B! Be4(!) 3.Bxf4 B- 4.Be3(5) mate
2.axb8=Q? Be4! 3.Qxf4 stalemate
1…axb1=N(!) 2.axb8=N! Nxd2(!) 3.Qc1! Ne4 4.Nc6 mate
2.axb8=Q? Nxd2! 3.Qxf4+ Kc3 4.??
3.Rxf4+ Ne4 4.??
3.Qc1 Ne4 4.??
(c) Tim Krabbé, 1998

The recent Dublin Blitz Championship 2020 (Gonzaga College, February 2) featured a game in which one player had the misfortune to resign in a position where he could force an almost immediate draw by stalemate. Well, these things happen: it’s not always easy to see everything on an increment of two seconds per move.
But there is an interesting puzzle buried within the game, regarding the diagrammed position:
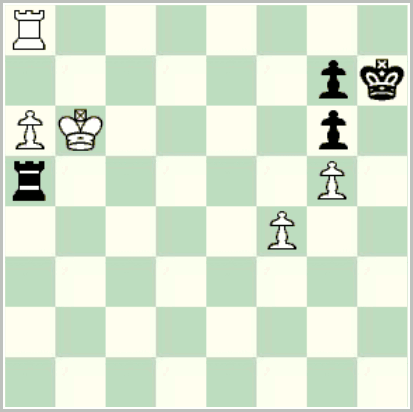 O’Cuilleanain – Przyborski, Dublin Blitz 2020
The game went 6… Ra4 7. Rc8, and now Black could have played the obvious enough 7… Rxa6+, since 8. Kxa6 is stalemate.
But if Black instead played 6… Rb5+!? in the diagrammed position, what would happen with best play? Does Black have a draw, or can White escape?
I freely admit I got this one wrong, even with much more than two seconds to think about it.
[Click to replay game (including solution)].
(See also the YouTube video of the finish.)
The celebrated ending of two knights versus a pawn is the hardest of the ‘basic’ endings, and was exhaustively analyzed long before the tablebase era. Interesting though it is, its importance is mostly theoretical, as the ending is very rare in practice. (It’s sometimes given as an example of what the practical player should not study.)
But “very rare” and “never” are two different things, and the ending cropped up yesterday in the Bunratty Challengers.
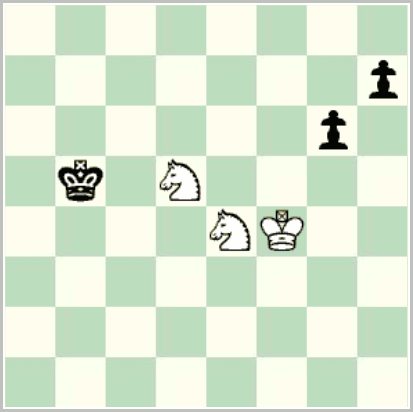 White – Mirza, Bunratty Challengers 2020
The diagrammed position shows the game at the critical point, a couple of moves before the ending in question appeared. The basic idea is well known: White needs to keep one black pawn on the board to avoid stalemate, and will usually need to blockade it behind the ‘Troitzky line’ e4-f5-g6-h4. Even then, the required winning procedure often runs foul of the 50-move rule.
The usual tablebases (e.g., Nalimov) show that from the diagrammed position Black loses with best play in 97 moves, but this does not account for the 50-move rule.
But the Syzygy tablebases give the information we need. From the diagram, Black has four moves that hold the draw via the 50-move rule: 48… Kc4, 48… Kc6, 48… g5+, and 48… h6. Instead, Diana Mirza played 48… h5?. The ending is so obscure that the ‘?’ is harsh, but this changes the valuation. White could now win via 49. Ng5! (only move), blockading the g-pawn behind the Troitzky line. It’s still a close-run thing: after, say, 49… h4 50. Ne3 h3 51. Kg3 Kc5 52. Kxh3, White mates in 49 moves with best play, with the next pawn move resetting the counter in 44 moves.
As it was, White erred with 49. Kg5?, when it’s a draw even without the 50-move rule. Using = to mean drawn with best play without the 50-move rule, and [=] to mean drawn only because of the rule, the play continued 49… Kc4? [=] (49… h4!, only move, =) 50. Ndf6? (50. Ne3+ [=]; 50. Nf4 [=]) 50… h4=. After 51. Kxh4 White continued, optimistically enough, for another 32 moves.
[Click to replay the full game.]
This is not the first Irish game to reach this ending: Keogh – Bjørgvik, World Senior 65+ Championship 2018 is the only other game in the ICU archive that did so. At all relevant stages that game was won for the two knights if not for the 50-move rule, but drawn once the rule is taken into account.
Check out Sean Cummins recent game in the Heidenfeld Trophy against Oliver Dunne, which has been posted on the IRLchess website.
Some considerable time ago, we had an example of a double seesaw/windmill here, in a game between Oliver Dunne and Pat Fitzsimons.
The theme arises again, and once again in a game of Oliver Dunne’s. This time he’s on the receiving end, in a game against Seán Cummins, from the Heidenfeld a couple of weeks ago.
The diagram shows a critical position, after White’s 19. Bd2-c3.
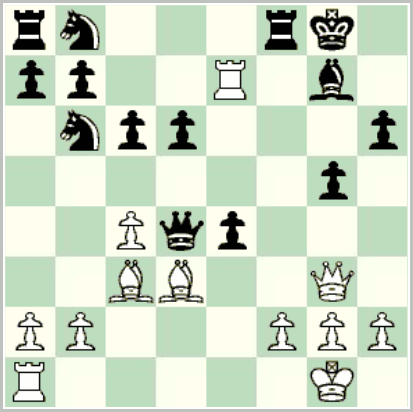 Cummins – Dunne, Heidenfeld Trophy 2019-20
After 19… Be5! 20. Bxd4 Bxg3 the windmill arose, but this time White saw no way of converting it to a win, and after 21. Rg7+ Kh8 22. Rf7+ Kg8 23. Rg7+ Kh8 24 Rf7+ Kg8, the players agreed a draw, on Black’s offer.
Can White do better? White’s best seems to be to recapture with 21. fxg3, when 21… exd3 White uses the windmill to capture the pawns on g5, b7, and a7 and the knight on b6. Though White is then just a single pawn up, engines think it’s clearly winning. Instead 21… Rf7 is a better try, when after 22. Rxe4 the windmill is avoided and material is level, but engines still think White has a decisive advantage.
The ICU Online Blitz Championship 2020 is being hosted on LiChess on Saturday, 21 March at 3pm. Its also free to enter.
The January edition of the ECU Newsletter has been published:

